

Over 60 percent of people use the wrong products for their skin type, risking irritation and dullness. Understanding your skin’s natural needs can make the difference between a glowing complexion and one that feels unbalanced or stressed. With a few simple steps, you can confidently identify your true skin type and choose a routine that actually works for you.
Table of Contents
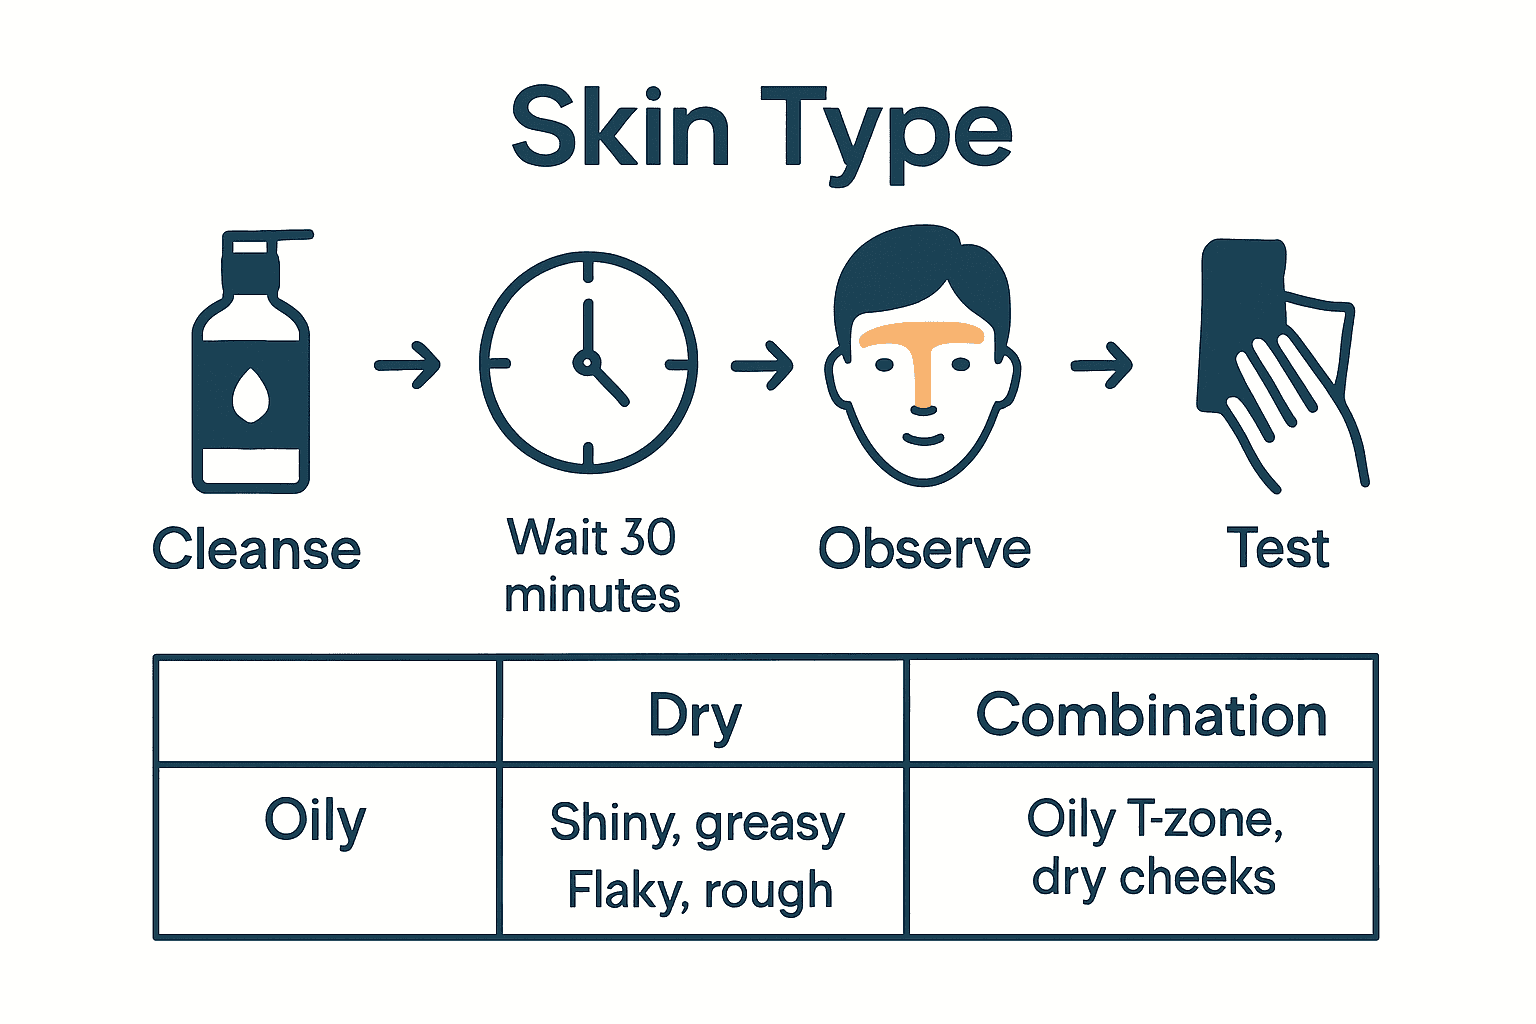
- Step 1: Prepare Your Face for Skin Analysis
- Step 2: Cleanse and Wait for Skin’s Natural Response
- Step 3: Observe Key Signs of Skin Type
- Step 4: Test with Blotting Sheet for Confirmation
- Step 5: Adjust Your Routine Based on Your Skin Type
Quick Summary
| Key Point | Explanation |
|---|---|
| 1. Cleanse Your Face Thoroughly | Use a gentle cleanser to remove makeup and impurities, ensuring accurate initial skin type assessment. |
| 2. Wait 30 Minutes Post-Cleansing | Allow your skin to stabilize for accurate observation of natural characteristics—avoid applying products during this time. |
| 3. Observe Skin Behavior Carefully | Assess oiliness, dryness, and texture, especially in the T zone versus cheeks, for insights into skin type. |
| 4. Use Blotting Sheets for Confirmation | Press blotting sheets on different facial areas to measure oil production objectively and confirm skin type. |
| 5. Tailor Skincare Routine Accordingly | Adjust your skincare products based on identified skin type to ensure maximum effectiveness and care for your skin’s needs. |
Step 1: Prepare Your Face for Skin Analysis
Preparing your face for an accurate skin type analysis requires a clean slate. According to Cleveland Clinic, the first step is washing your face with a gentle cleanser to remove makeup, pollutants, and impurities.
Start by selecting a mild facial cleanser appropriate for sensitive skin. Wash your hands thoroughly first to prevent transferring additional bacteria to your face. Use lukewarm water and gently massage the cleanser in circular motions across your entire face, being careful around delicate eye areas. Uk Skincare recommends patting your face dry with a clean soft towel instead of rubbing, which can irritate the skin.
Before beginning your analysis, wait approximately 30 minutes after cleansing. This allows your skin to return to its natural state without makeup, oils, or residual products that could skew your assessment. During this time, avoid touching your face and sit in a well-lit area with a clean mirror to observe your skin’s natural characteristics.
Quick tip: If possible, perform this analysis in the morning before applying any skincare products for the most accurate results.
Step 2: Cleanse and Wait for Skin’s Natural Response
After preparing your face by cleansing, the next critical step is allowing your skin to stabilize and reveal its natural characteristics. Healthline recommends waiting precisely 30 minutes without applying any additional skincare products to obtain an accurate skin type assessment.
During this waiting period, observe your skin carefully in good lighting. Notice how your skin feels and appears without any external interventions. Does it feel tight and uncomfortable? Appear shiny and oily? Look flaky or dry? These natural responses will provide crucial insights into your unique skin type.
To maximize the accuracy of your observation, find a comfortable spot near a clean mirror with natural daylight. Avoid touching your face during this time to prevent introducing oils or disrupting your skin’s natural state. Consider using this waiting period to prepare your observation notes or gather materials for the next steps of your skin type analysis.
Quick tip: If possible, perform this assessment in the morning when your skin is most balanced and before environmental factors like humidity or temperature changes can influence its appearance.
Step 3: Observe Key Signs of Skin Type
Now that you have allowed your skin to rest and stabilize, it is time to carefully analyze its unique characteristics. According to Cleveland Clinic, paying close attention to how your skin feels and appears after cleansing can reveal important insights into your specific skin type.
Healthline suggests observing your skin’s behavior in different areas. Focus on your T zone (forehead, nose, and chin) and check for signs of oiliness or shine. Dry skin typically feels tight or shows flakiness, while combination skin will exhibit different characteristics in various facial regions. Look for subtle differences like excess shine in the T zone compared to drier cheek areas.
To make your assessment more comprehensive, gently press a clean tissue against different areas of your face about 30 minutes after cleansing. Oily skin will leave noticeable oil marks on the tissue, while dry or normal skin will show minimal to no residue. Pay attention to how your skin feels skin feels when you smile or make facial expressions. Tight or uncomfortable sensations often indicate dryness, while a smooth and supple feeling suggests balanced skin.
Quick tip: Natural lighting provides the most accurate view of your skin type, so choose a well lit area near a window for your assessment.
Step 4: Test with Blotting Sheet for Confirmation
To definitively confirm your skin type, blotting sheets offer a simple yet effective diagnostic tool. Healthline recommends using these specialized papers to precisely measure your skin’s oil production by gently pressing them against different facial areas.
Advantage Pharma suggests conducting this test a few hours after cleansing to capture your skin’s most natural state. Begin by selecting clean blotting papers and systematically press them against distinct facial zones: forehead, cheeks, nose, and chin. Observe the amount and distribution of oil absorbed. If the sheet shows significant oil across all areas, you likely have oily skin. When oil appears primarily in the T zone while cheeks remain relatively dry, this indicates combination skin.
Interpret your results carefully. Minimal to no oil absorption suggests dry or normal skin types. Look for nuanced differences between facial regions. The blotting sheet method provides an objective measurement that complements your earlier visual and tactile observations.
 Consider repeating the test at different times of day to establish a consistent pattern and confirm your initial assessment.
Quick tip: Use white or translucent blotting sheets to clearly see oil transfer and get the most accurate results.
Step 5: Adjust Your Routine Based on Your Skin Type
Now that you have confidently identified your unique skin type, it is time to customize your skincare approach. Cleveland Clinic emphasizes the importance of tailoring your skincare routine specifically to your skin’s individual characteristics and needs.
For those with oily skin, focus on lightweight oil free products that help control excess sebum without stripping your skin. Gel based moisturizers and gentle foaming cleansers work best. If you have dry skin, prioritize rich hydrating formulas with ingredients like hyaluronic acid and ceramides that help restore moisture barriers. Combination skin requires a strategic approach using different products for different facial zones: oil controlling solutions for the T zone and gentler hydrating products for drier areas.
Each skin type demands a nuanced strategy. Sensitive skin requires hypoallergenic and fragrance free products that minimize potential irritation. Normal skin types can experiment more freely with various skincare formulations. Remember that your skin is dynamic and can change with seasons, stress levels, and hormonal shifts. Discover our comprehensive guide on creating the perfect skincare routine to further refine your approach.
Quick tip: Always patch test new products and introduce them gradually to understand how your specific skin responds.
Discover Skincare That Truly Matches Your Skin Type
Identifying your skin type naturally is the first step toward healthier, more radiant skin. This guide helps you understand critical signs like oiliness, dryness, and combination skin so you can tailor your routine with confidence. If you struggle with finding products that really work or feel overwhelmed by the choices, it’s time to make self-care simple and effective.

Start customizing your skincare journey with products designed for your unique skin profile. Explore our carefully curated selection at GNS Beauty & Personal Care where eco-conscious luxury meets proven results. Whether you need oil-control formulas, rich hydration, or gentle solutions for sensitive skin, you can find everything to build a routine that supports your natural beauty. Don’t wait to experience the confidence that comes with skin that feels balanced and healthy. Visit GNS Beauty now and take the next step toward glowing skin every day.
Frequently Asked Questions
How can I prepare my face for a skin type analysis?
To prepare your face for a skin type analysis, start by washing it with a gentle cleanser to remove any makeup or impurities. After cleansing, wait about 30 minutes to allow your skin to return to its natural state before starting your analysis.
What should I observe during my skin type analysis?
While analyzing your skin type, observe how your skin feels and appears across different areas of your face, especially the T zone (forehead, nose, and chin). Look for signs of oiliness, dryness, tightness, or flakiness to identify your unique skin characteristics.
How do I use blotting sheets to confirm my skin type?
To use blotting sheets, gently press them against different areas of your face after waiting a few hours post-cleansing. If the sheet absorbs oil from all areas, you likely have oily skin; if oil is primarily in the T zone, you may have combination skin.
What should I do after determining my skin type?
Once you’ve identified your skin type, adjust your skincare routine accordingly. For oily skin, choose lightweight, oil-free products, while those with dry skin should focus on hydrating formulas containing ingredients like hyaluronic acid.
How can I ensure accurate results when assessing my skin type?
Ensure accurate results by conducting your skin type assessment in natural lighting and avoiding any skincare products before the analysis. This will help reveal your skin’s natural characteristics without external influences that may affect its appearance.
Is it necessary to retest my skin type over time?
Yes, it’s beneficial to retest your skin type periodically as skin can change due to factors like the seasons, stress, or hormonal shifts. Consider reviewing your skin type every few months to ensure your skincare routine remains effective.


Hinterlasse einen Kommentar
Alle Kommentare werden vor der Veröffentlichung geprüft.
Diese Website ist durch hCaptcha geschützt und es gelten die allgemeinen Geschäftsbedingungen und Datenschutzbestimmungen von hCaptcha.